
You can transform cluttered closets by taking inventory first, spot duplicates and worn bags you’ll donate. Then use vertical solutions like pegboards, over-the-door hooks, and floating shelves to maximize limited space. Closet rod dividers and under-bed containers hide bags efficiently while keeping them accessible. Rolling carts work great for smaller bags, and vacuum storage compresses seasonal luggage. Don’t forget labels, mark everything by type or season so you’ll find what you need instantly. The right system saves time and space, turning chaotic storage into something actually manageable and organized.
Assess Your Collection Before Choosing Storage
Before you buy any storage bins or fancy organizers, take a real look at what you’re actually storing, seriously, pull everything out and count your bags. This collection curation step matters because you can’t choose the right solution without understanding your actual inventory.
Do you have fifteen bags or fifty? Are they cluttered in your closet, scattered across shelves, or stuffed under your bed? A honest storage assessment reveals what you really own versus what you forgot existed.
Once you’ve inventoried everything, you’ll spot duplicates, worn-out pieces, and bags you genuinely never use. This clarity helps you decide what deserves prime real estate in your small space and what you might donate. Determine frequency of use for each bag to prioritize which pieces should be most accessible in your storage solution.
Pegboards for Visible Bag Display
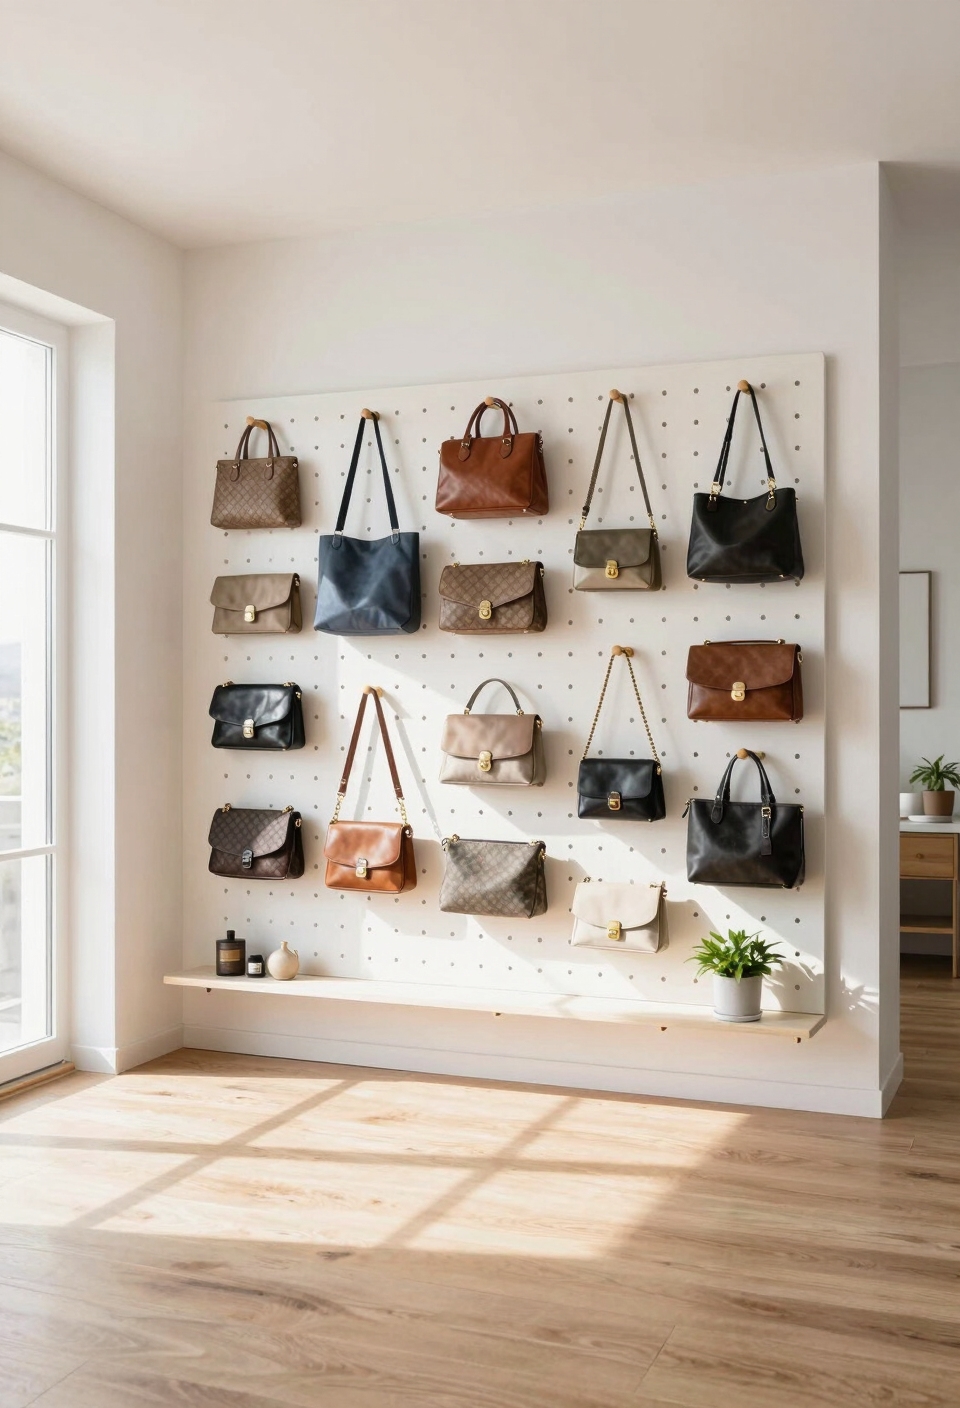
Why not let your favorite bags become part of your room’s décor instead of hiding them away? Pegboards offer a smart solution for displaying your collection while maximizing wall space. You’ll find various pegboard styles, from sleek metal to rustic wood, that match your room’s vibe. Add decorative pegs in different colors or finishes to hang your bags securely. This setup keeps everything visible and accessible, so you can grab what you need instantly. Plus, arranging your bags thoughtfully transforms your wall into an eye-catching display that showcases your style without eating up precious floor or closet space. When combined with hooks for organizing accessories, pegboards create a comprehensive wall storage system that works seamlessly for both bags and complementary items.
Over-the-Door Hooks for Small Spaces
If wall space is already claimed by pegboards or other décor, don’t worry, your doors are about to become your secret storage weapon. Over the door styles come in various materials: metal hooks, fabric organizers, and tiered racks that maximize vertical real estate. You’ll find stylish installations range from sleek minimalist designs to decorative options matching your room’s vibe. Most hooks accommodate standard door thickness, typically fitting 1.375 to 1.75 inches. Installation requires zero tools, simply hang and adjust. This approach works brilliantly for lightweight bags, keeping frequently used purses, totes, and crossbodies within arm’s reach while preserving precious floor and closet space.
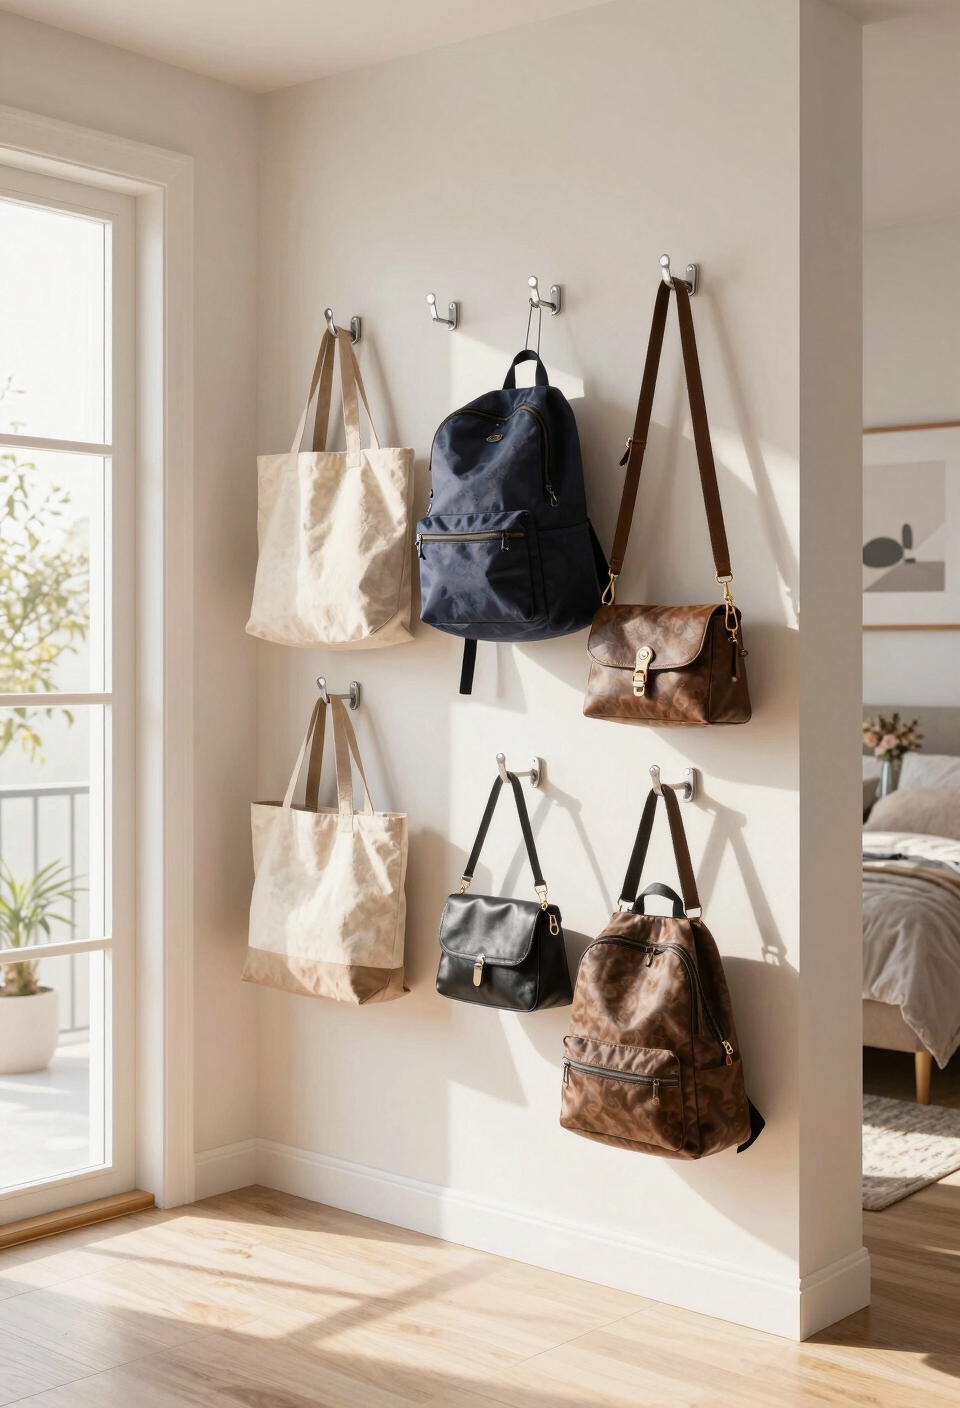
Behind-Door Wall Hooks for Overlooked Space
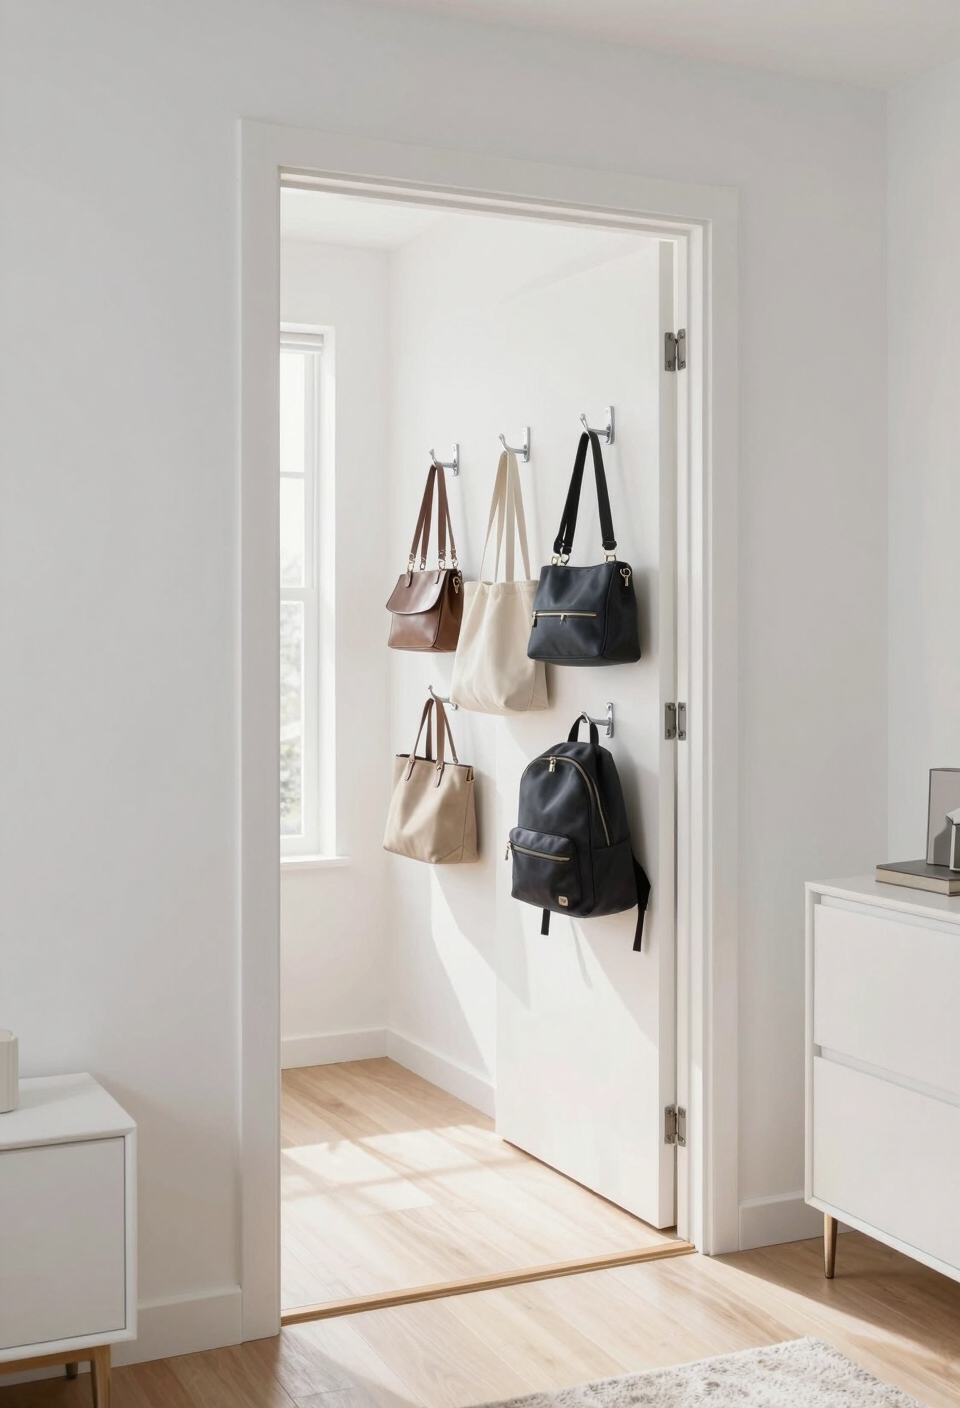
You’ve probably never thought much about the wall space hiding directly behind your bedroom or closet door, yet it’s genuinely one of the easiest spots to claim back. Installing wall hooks there maximizes verticality without eating into your room’s floor space. You’ll want sturdy adhesive hooks or mounted hardware, depending on your bag weights. Consider innovative materials like metal or wooden hooks that handle daily wear. This overlooked real estate works perfectly for everyday bags, keeping them accessible but out of sight. You’re essentially creating hidden storage that nobody notices until they need it. By implementing smart organization strategies throughout your closet, you can transform how you use every available inch, including often-neglected door space.
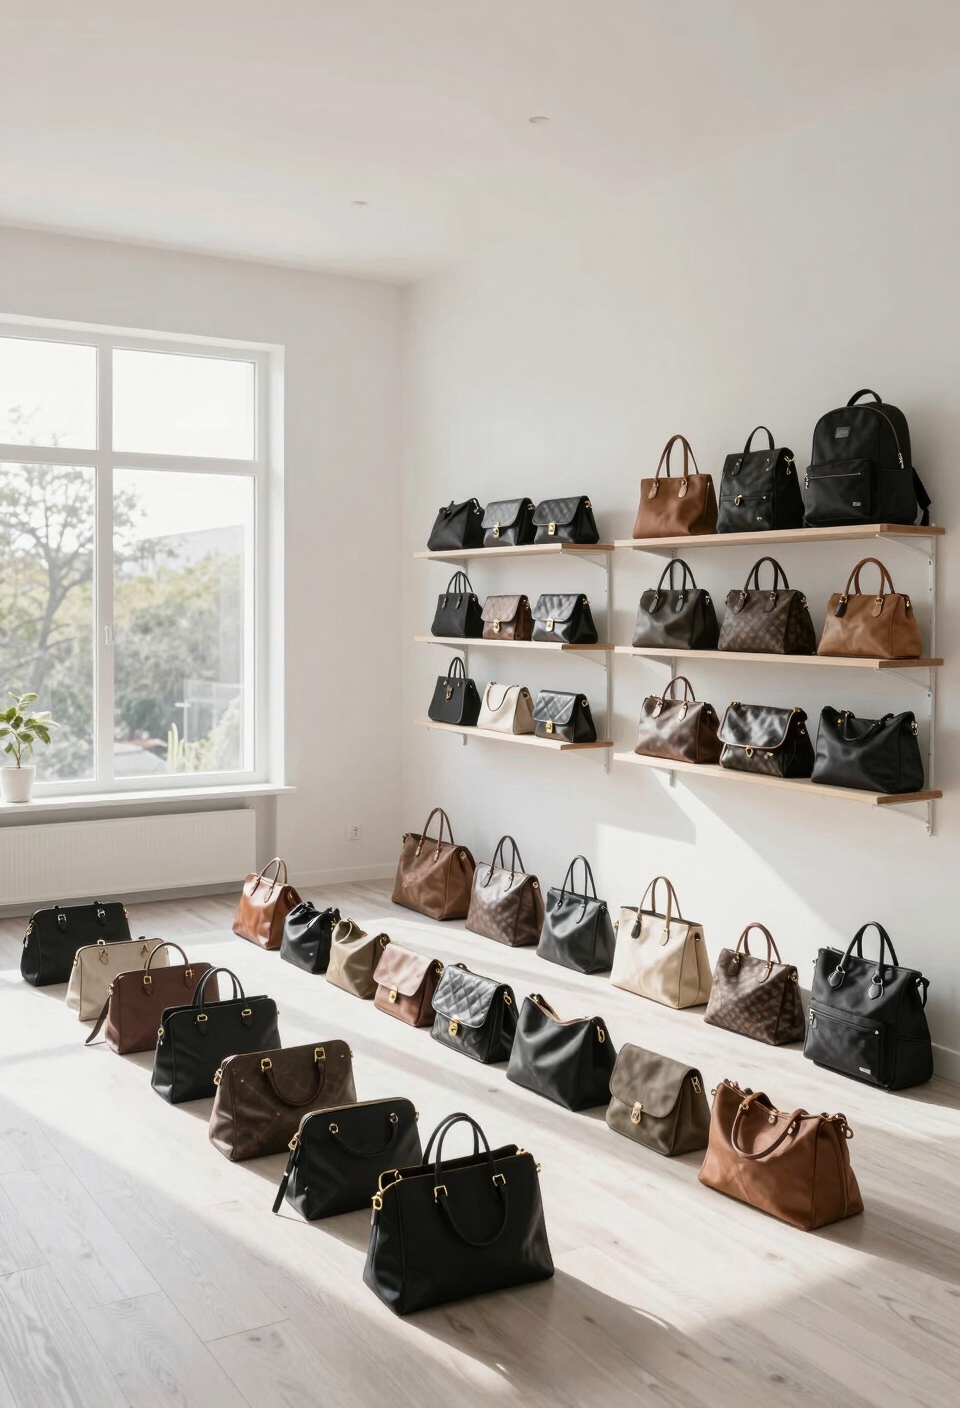
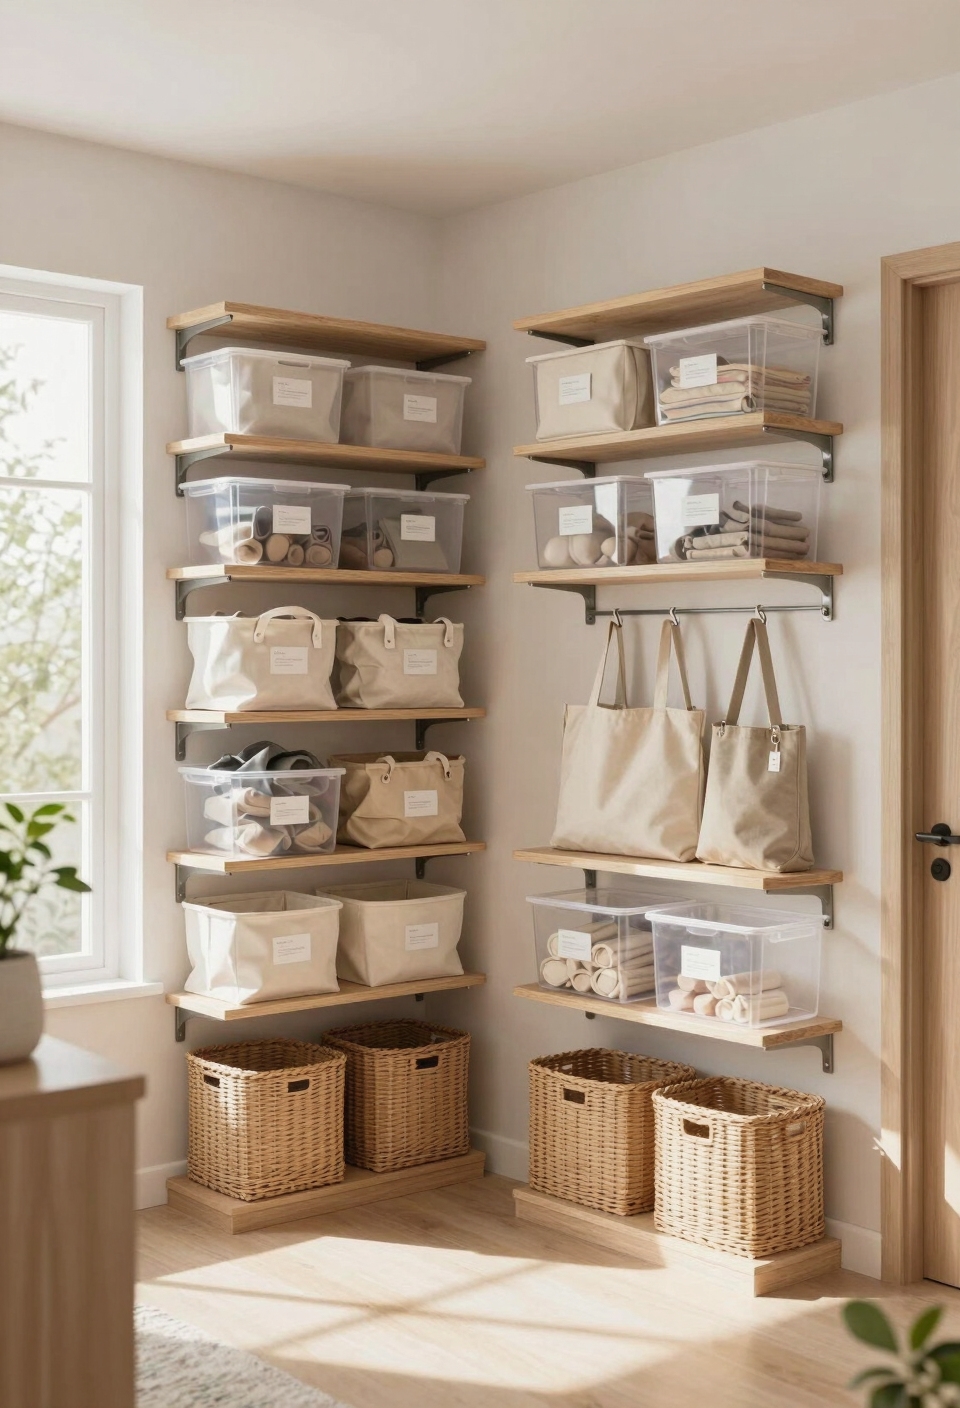
Floating Shelves in Hallways and Entryways
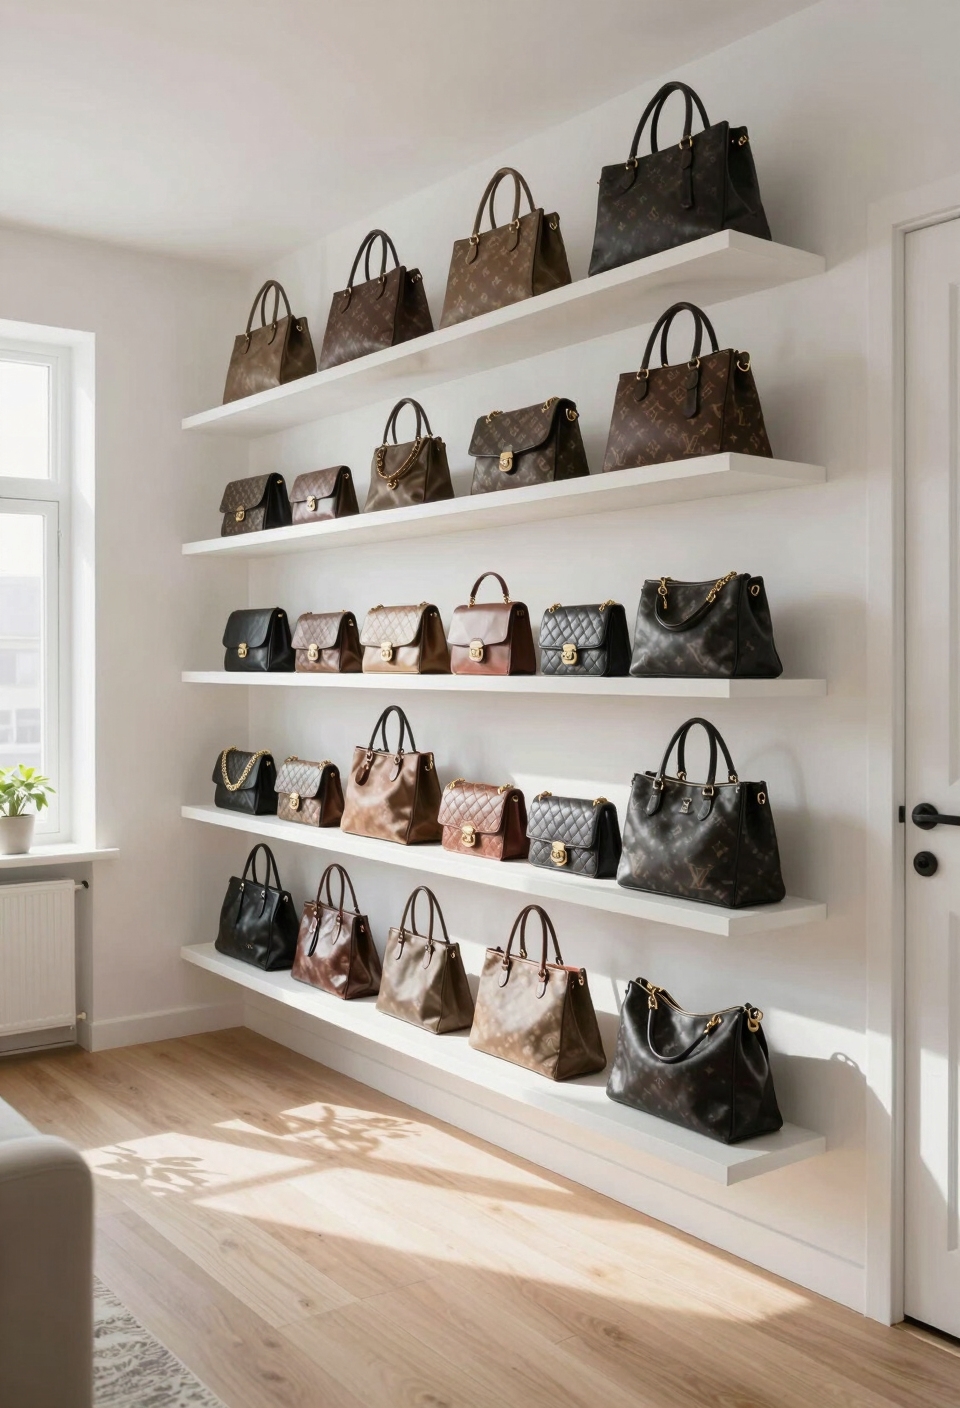
While behind-door hooks work great for hidden storage, floating shelves in hallways and entryways give your bags a more prominent home that’s both practical and stylish. You’ll improve your hallway aesthetics while creating functional entryway organization that actually works.
Install shelves about 12 to 18 inches apart, using sturdy brackets rated for your bags’ weight. Wood or metal shelves complement most décor styles. Arrange your bags by size or color, keeping frequently used ones at eye level. For bags you don’t use regularly, consider collapsible storage solutions to save space when they’re not needed.
This approach keeps bags accessible without cluttering your floor space. You’ll appreciate how much easier mornings become when everything’s visible and organized right by the door.
Corner Shelving Units for Unused Angles
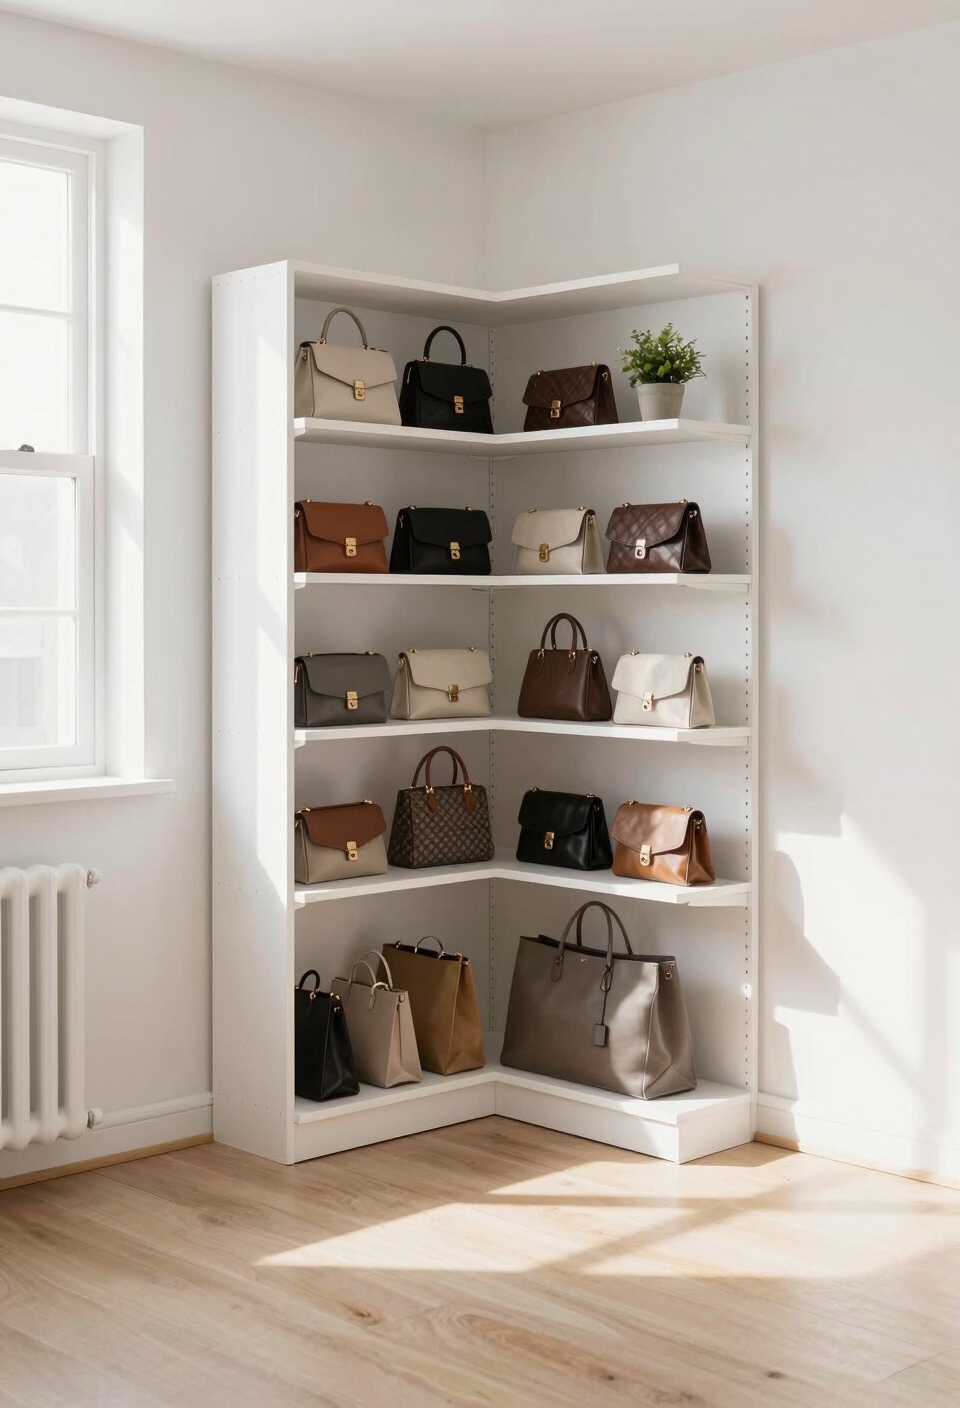
Corner shelving units tackle the awkward angles in your room that floating hallway shelves can’t reach. You’ve probably noticed those empty corners collecting dust, they’re actually prime real estate for bag storage.
A corner installation gives you angle storage that works with your room’s layout, not against it. These L-shaped units fit snugly into tight spaces, maximizing every inch you’ve got.
You can install corner shelves about 12-18 inches apart, depending on your bags’ size. Wood or metal options both work well and look clean without taking up floor space.
Your bags stay organized, visible, and easily accessible, plus you’ve finally figured out what to do with that wasted corner.
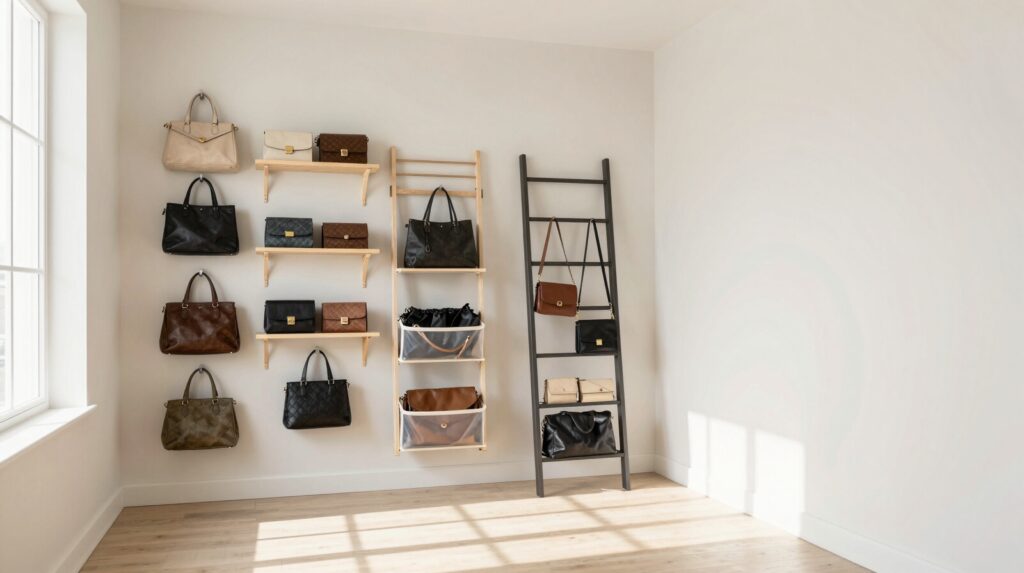
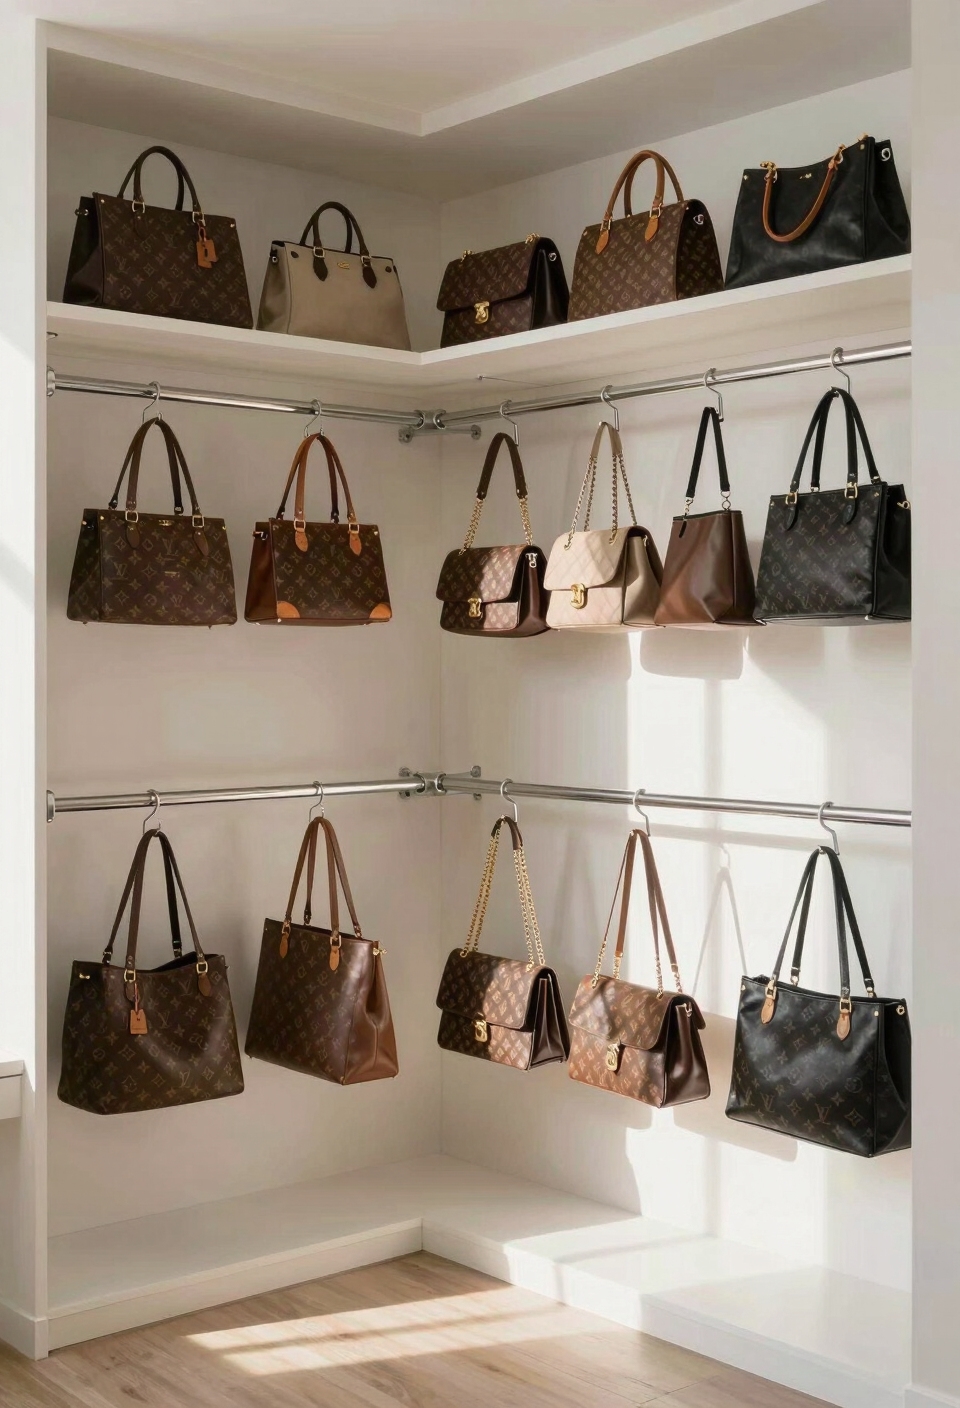
Hanging Shelves for Vertical Storage
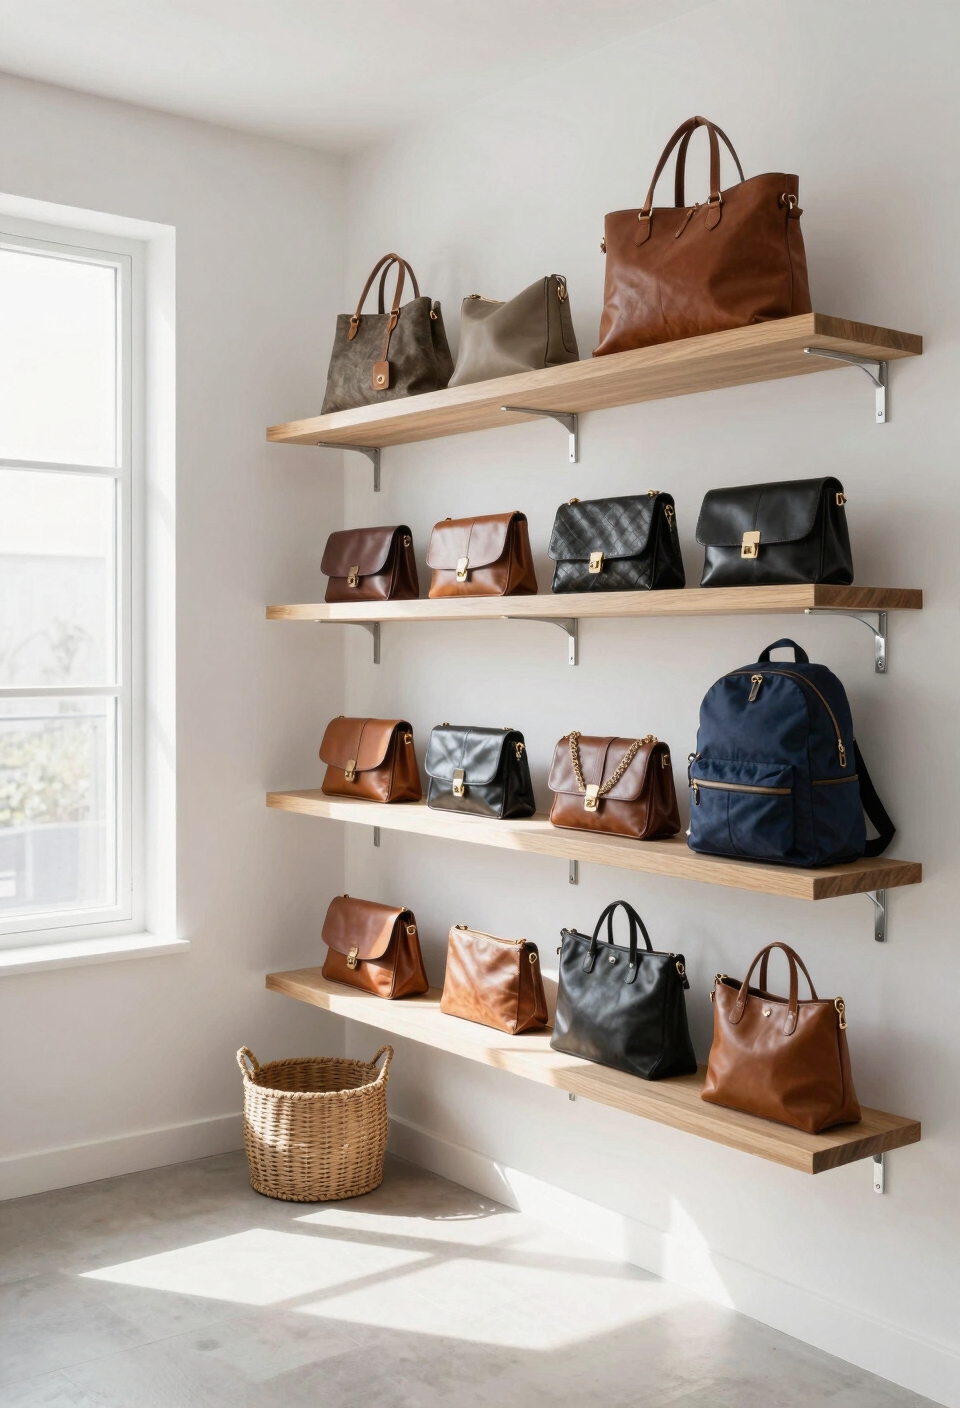
Walls are basically blank canvases waiting to hold your bag collection. You’ve got tons of vertical space you’re probably not using, and hanging shelves solve that problem perfectly. Floating shelves, metal brackets, and wooden planks work great as hanging shelf materials for displaying your bags attractively. DIY shelf installation isn’t complicated, you’ll just need a level, drill, and wall anchors. Start by measuring your wall space, then mark where you want shelves positioned. You can space them about twelve to eighteen inches apart, giving you flexibility for different bag sizes. Like vertical shelving units, hanging shelves maximize wall height for storage while improving accessibility and maintaining a cohesive look. This approach keeps your bags organized, visible, and completely off your floor.
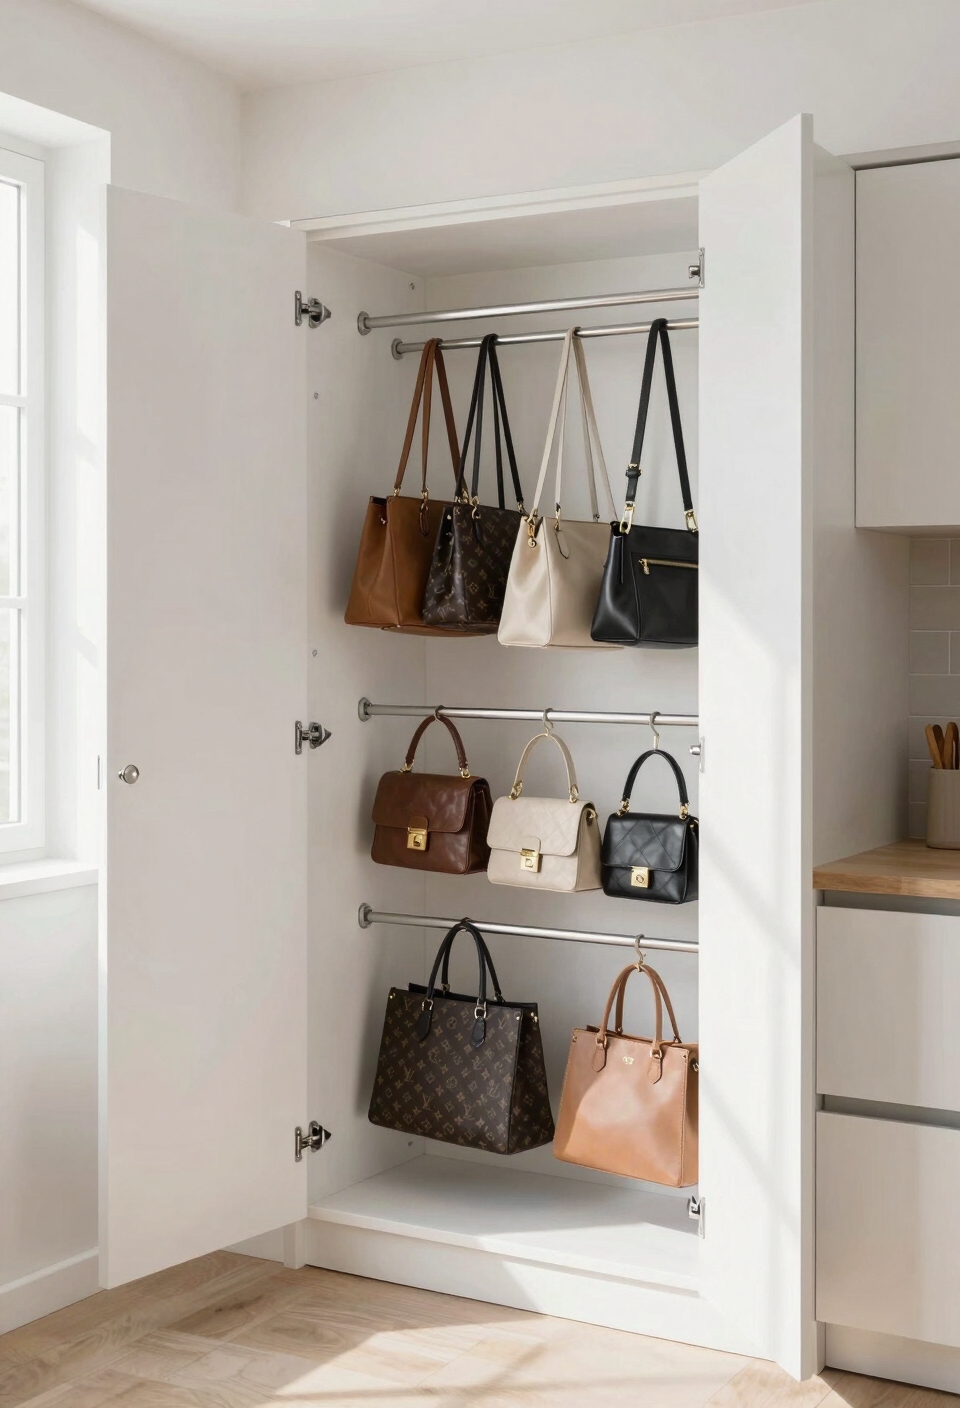
Closet Rod Dividers and Clips
If you’ve got bags crammed onto a single closet rod, dividers and clips are about to become your best friends. These simple closet organization tools separate your collection, preventing everything from sliding together into one jumbled mess.
Rod dividers, typically made from plastic or metal, space bags about 2-3 inches apart. Clips work similarly, gripping individual bags and keeping them stationary. You’ll find these systems at most home stores for under $15.
The beauty? You’re maximizing your existing rod systems without drilling holes or installing shelves. Your bags stay visible, accessible, and organized. No more bag avalanche when you grab one.
Tension Rods Inside Cabinets
Another smart move for small spaces is installing tension rods inside your cabinets or under-sink areas. You’ll create instant hanging space for bags without taking up floor room. Position tension rod placement horizontally across cabinet shelves, then hang smaller bags, clutches, or crossbodies from hooks. This interior cabinet organization method keeps bags visible and accessible while maximizing unused vertical space. You can install multiple rods at different heights, stacking more bags efficiently. The setup takes minutes, requires no tools beyond the rod itself, and works great in bathroom cabinets, kitchen drawers, or bedroom closets. Your bag collection stays organized and surprisingly hidden away.
Under-Bed Storage Containers
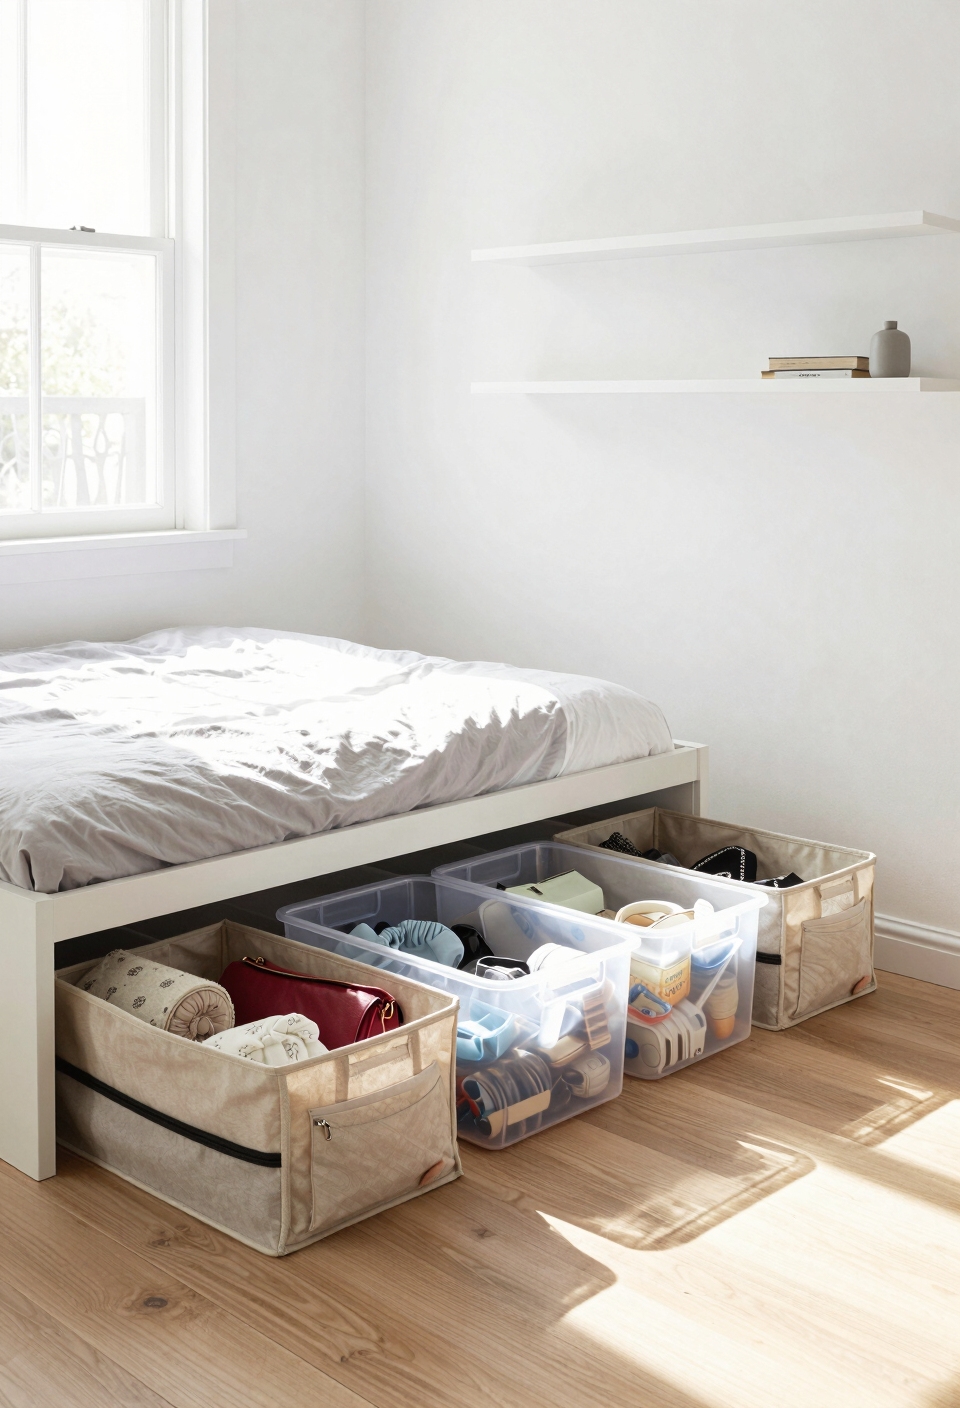
The space hiding right underneath your bed is basically a goldmine for bag storage, and you’re probably not even using it. Flat, rolling containers slide easily under frames, making under bed organization surprisingly simple. You’ll want to measure your clearance first, most beds offer 8-12 inches of space.
Clear plastic containers work best because storage accessibility matters; you’ll actually see what’s inside without pulling everything out. Label each container by bag type: clutches, totes, backpacks. Rolling wheels let you grab whatever you need without awkward stretching or back strain.
This solution keeps bags dust-free, organized, and completely out of sight.
Vacuum Storage Bags for Seasonal Bags
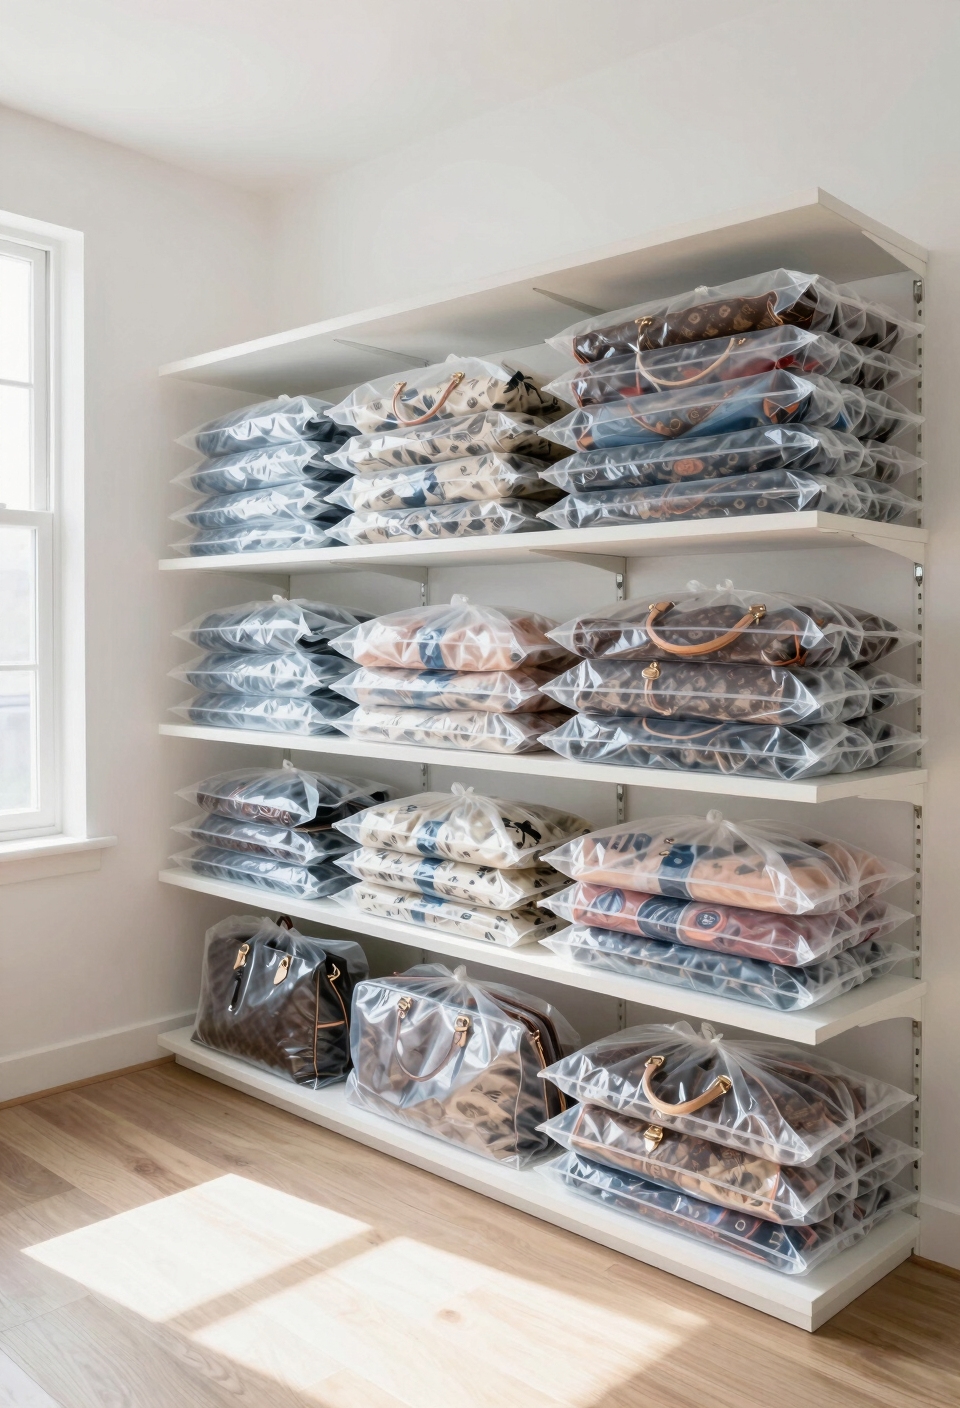
Vacuum storage bags are absolute space-savers when you’ve got seasonal bags taking up room year-round. Here’s the deal: these bags compress your bulky luggage, duffels, and totes down significantly, freeing up valuable closet space.
The vacuum bag advantages are pretty straightforward. You’ll remove air with a vacuum cleaner, shrinking bags to roughly half their original size. They’re moisture-resistant too, protecting your stuff from dust and humidity.
For seasonal storage tips, label everything before sealing. Store compressed bags on high shelves or in closets where you won’t forget them. Come next season, you’ll appreciate how easily you can locate exactly what you need without hunting through cluttered spaces.
Wooden Crates and Stackable Boxes

If you’re looking for a stylish way to organize bags while keeping everything visible and accessible, wooden crates and stackable boxes might be your answer. You can arrange crates on shelves or the floor, creating custom crate arrangements that fit your space perfectly. Box stacking works great too, just label each container so you’ll know what’s inside without digging around. These storage solutions let you see your bags at a glance, making it easy to grab what you need. Plus, wooden crates add a rustic, organized look to any room. They’re affordable, durable, and way better than cramming bags into random corners.
Clear Plastic Bins With Labeled Categories
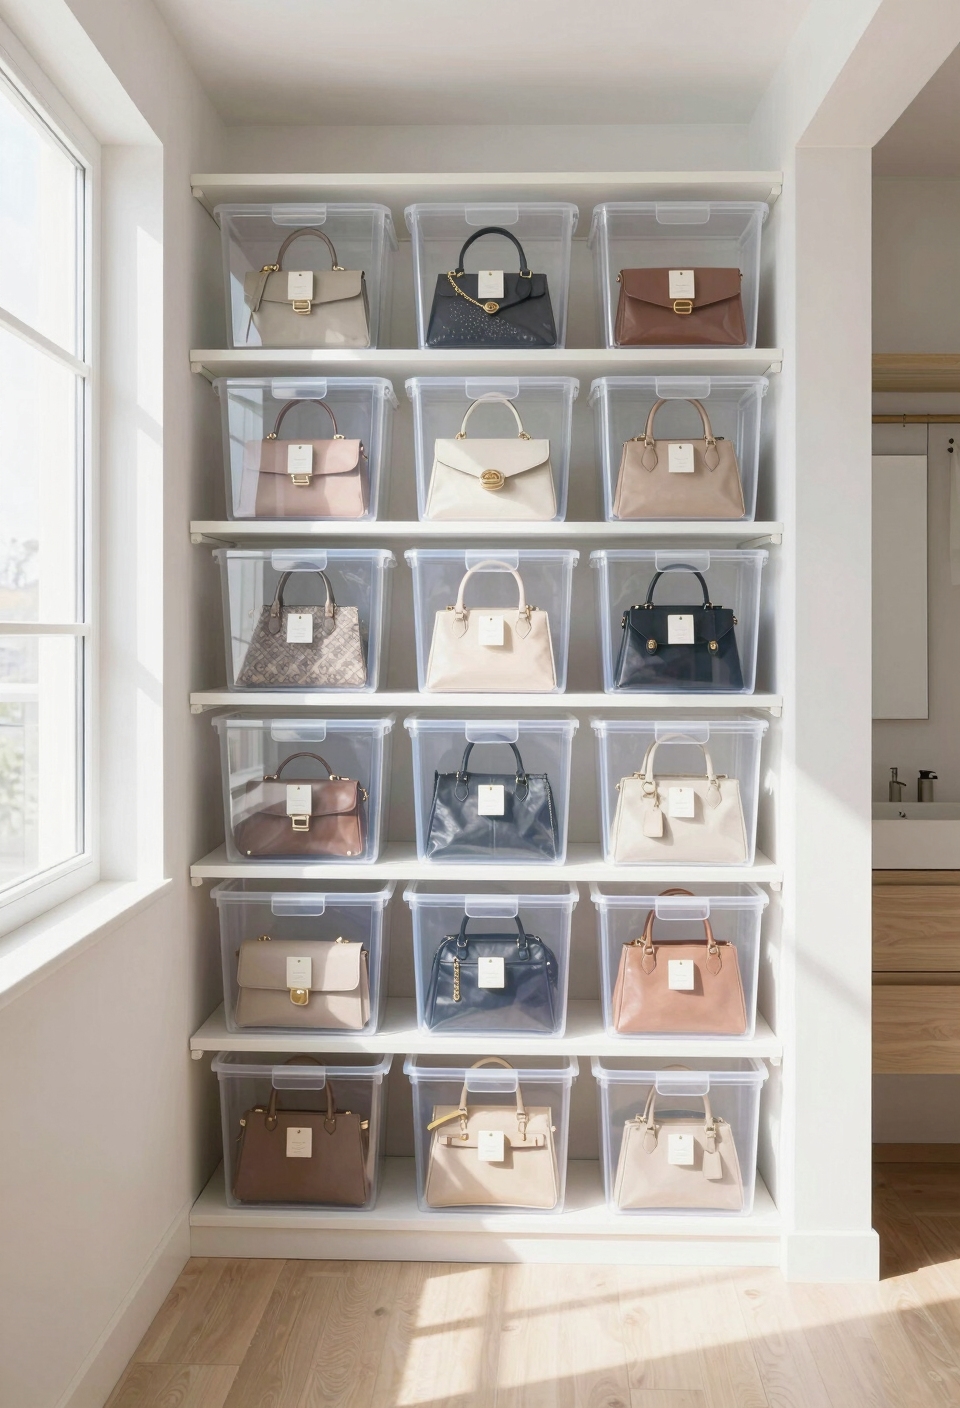
While wooden crates give you that rustic charm, clear plastic bins offer something equally valuable, complete visibility without any guessing games. You’ll instantly spot what’s inside each container, eliminating that frustrating hunt through stacked storage.
Your labeling system becomes the real turning point here. Use a permanent marker or printed labels to categorize your bags by type, clutches, totes, crossbody, seasonal. This organized approach saves you time and prevents duplicate purchases.
Stack these clear bins vertically on shelves or under beds. The transparency means you’re maximizing your small space while keeping everything accessible and neatly sorted. No more mystery boxes cluttering your closet.
Rolling Carts With Multiple Tiers
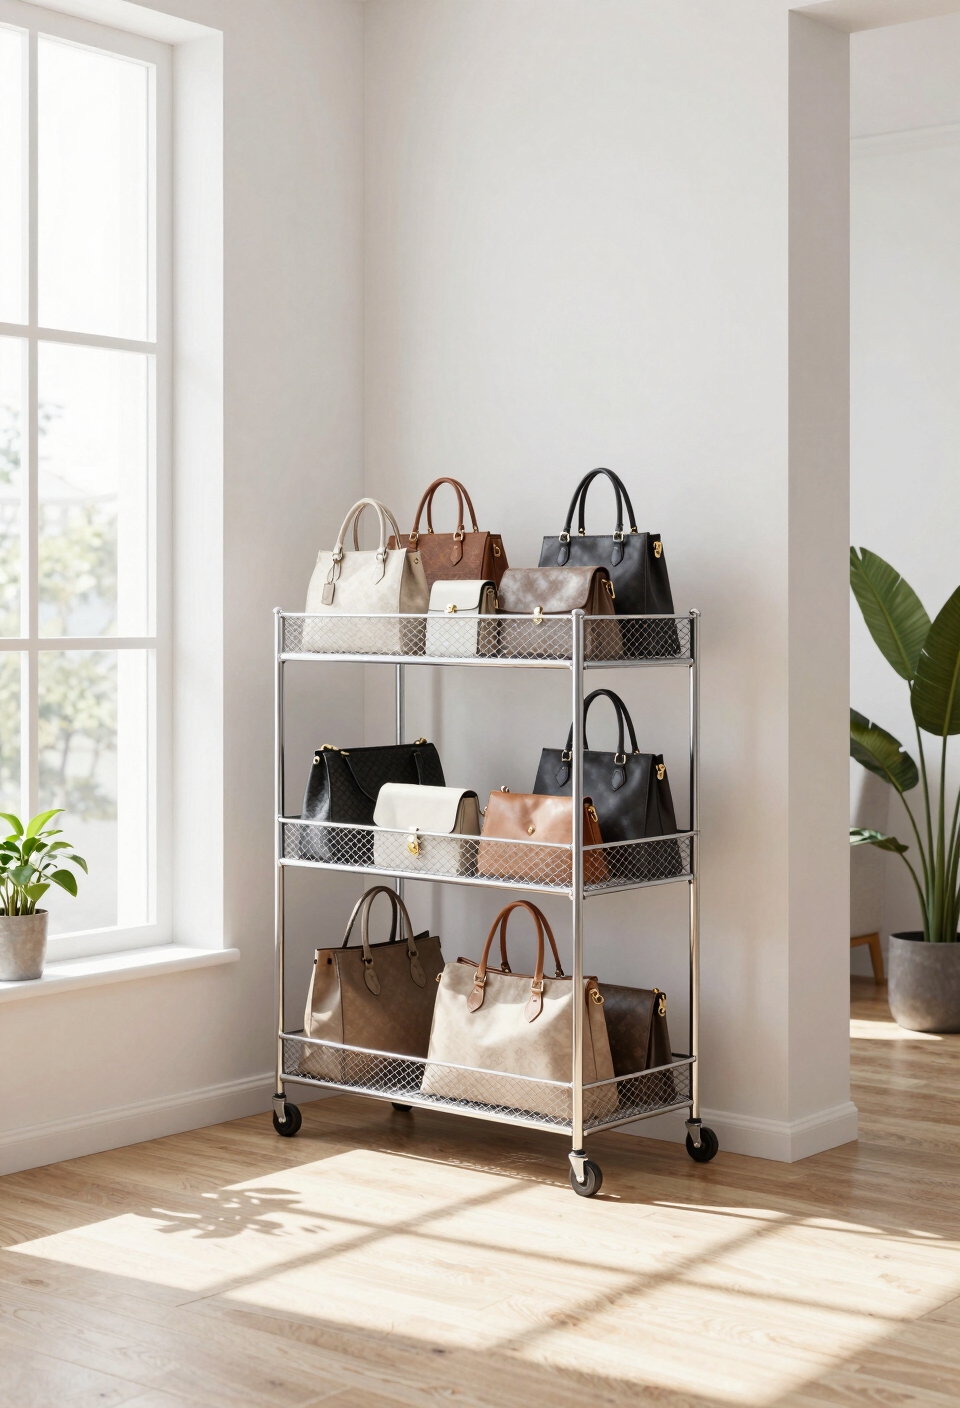
Rolling carts with multiple tiers might be your answer if you’re dealing with bags everywhere and barely any floor space. These compact rolling cart organization solutions fit snugly in closets, corners, or against walls without demanding precious square footage. You’ll appreciate how tiered storage solutions let you stack bags vertically, keeping everything visible and accessible. Each tier holds different bag types, clutches on top, totes in the middle, larger duffels below, making everything easy to grab. The wheels? They’re your secret weapon, letting you roll the cart wherever you need it. Plus, you can tuck it away when guests arrive.
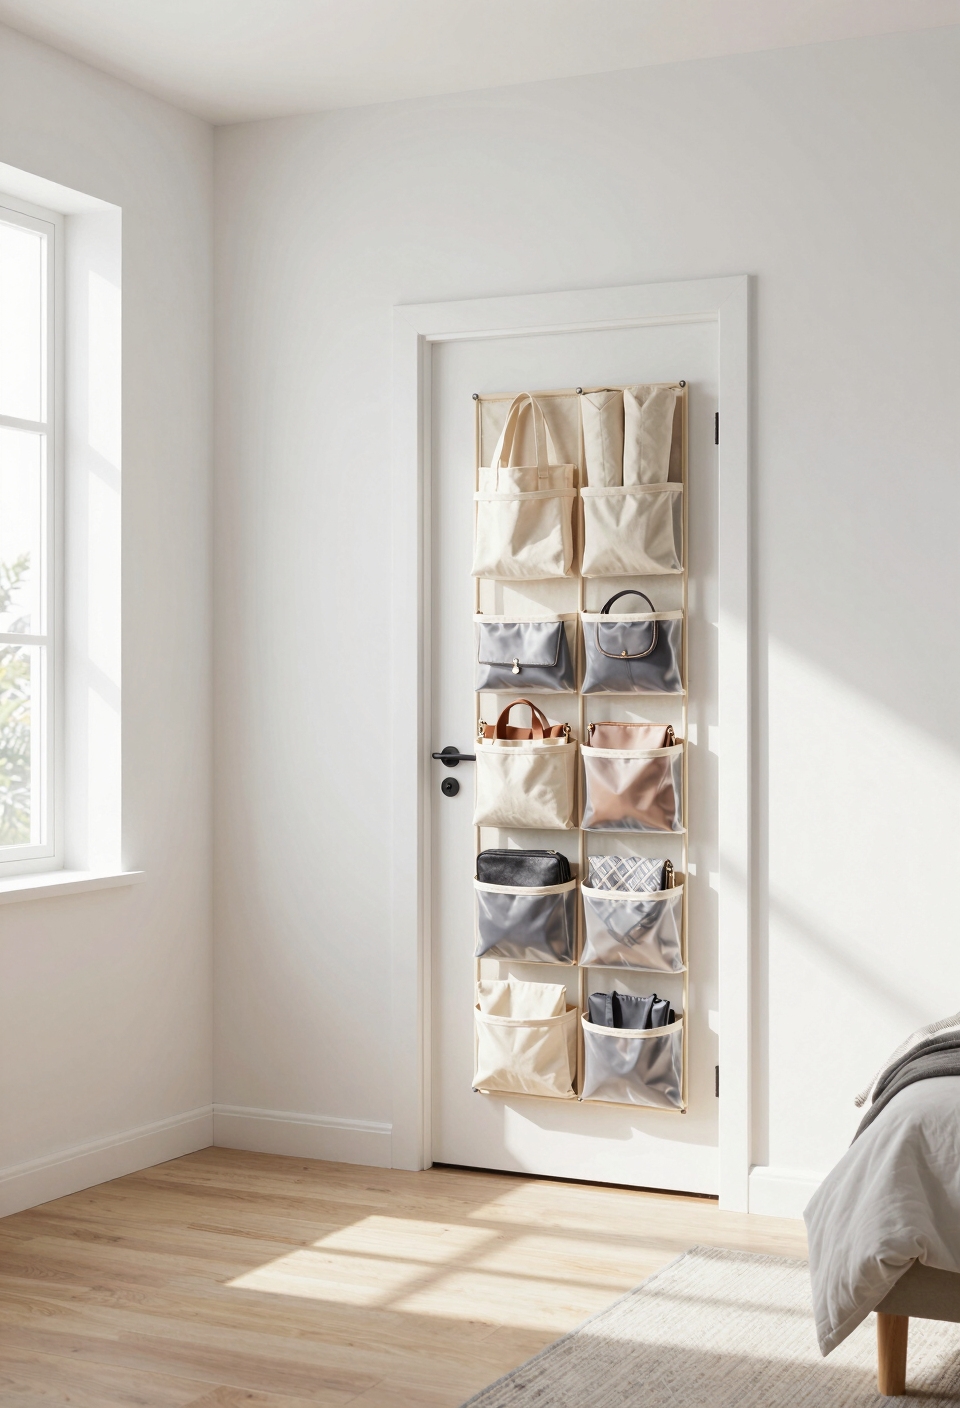
Hanging Shoe Organizers for Smaller Bags
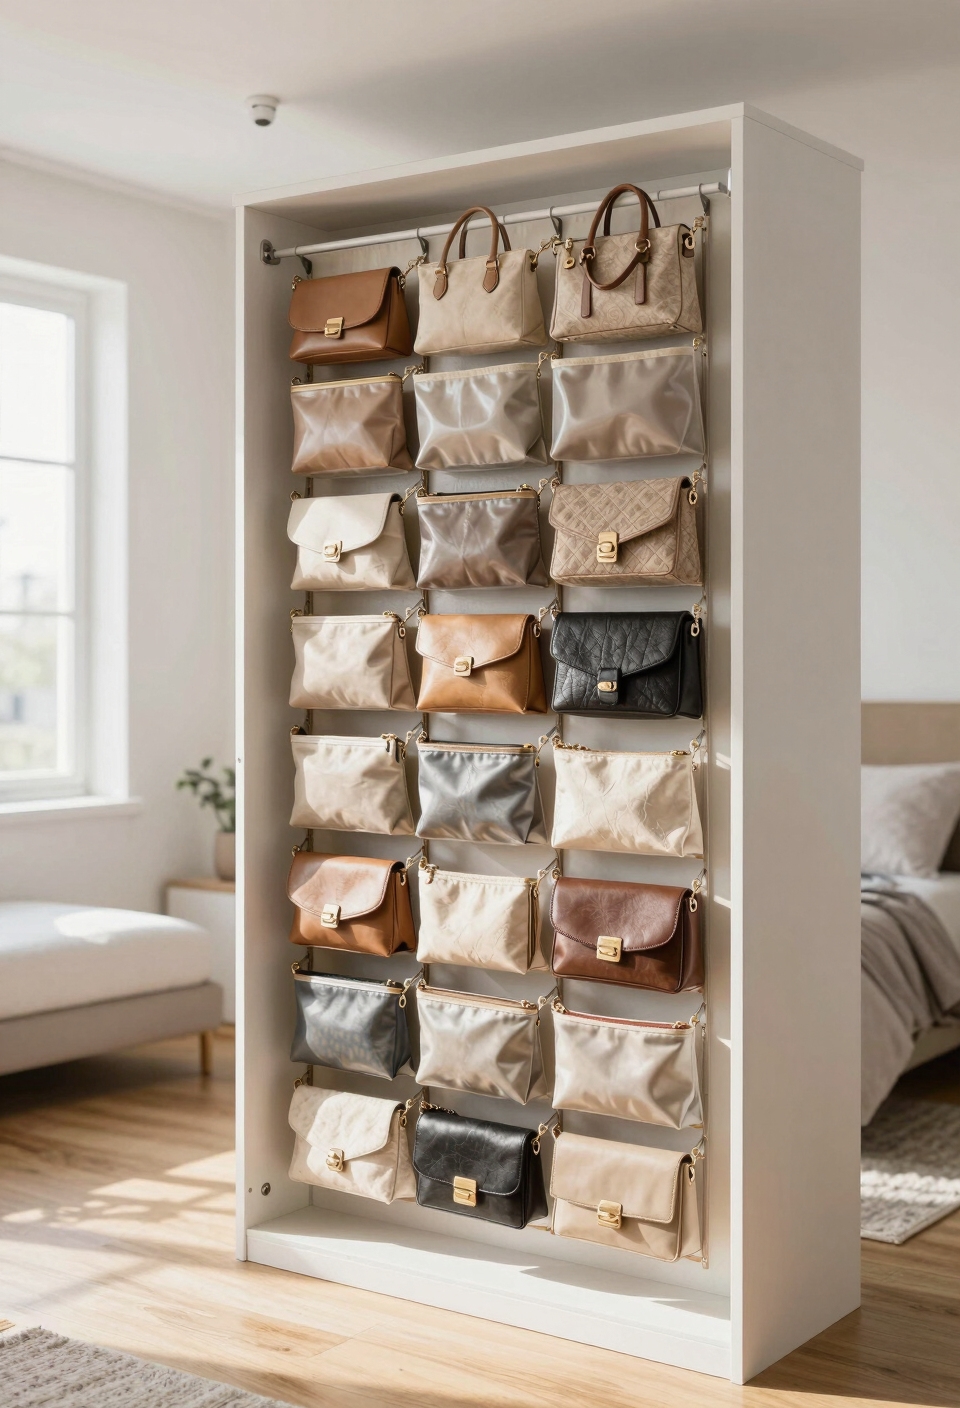
When you’re working with clutches, crossbodies, and smaller pouches, a hanging shoe organizer becomes your new best friend. These hanging organizers, typically featuring clear plastic pockets, fit perfectly on closet doors or walls without eating floor space. You’ll love how each pocket holds one bag, keeping everything visible and accessible. For bag organization, this solution costs just ten to twenty dollars and takes minutes to install. The best part? You can see all your bags at once, making outfit planning way easier. Plus, they work great for wallets, scarves, and accessories too.
Drawer Dividers for Clutches and Crossbodies

If you’ve got a drawer that’s become a jumbled mess of bags, drawer dividers offer a straightforward fix. You can use adjustable plastic dividers or fabric bins, creating dedicated sections for each bag type. For clutch organization, small compartments work perfectly, think of them as VIP sections for your evening bags. Crossbody storage benefits from slightly larger spaces where straps won’t tangle together. Install dividers vertically or horizontally, depending on your drawer depth and bag sizes. This simple system keeps everything visible and accessible, so you’ll actually grab bags instead of forgetting you own them.
Hangers and Garment Bags for Large Totes
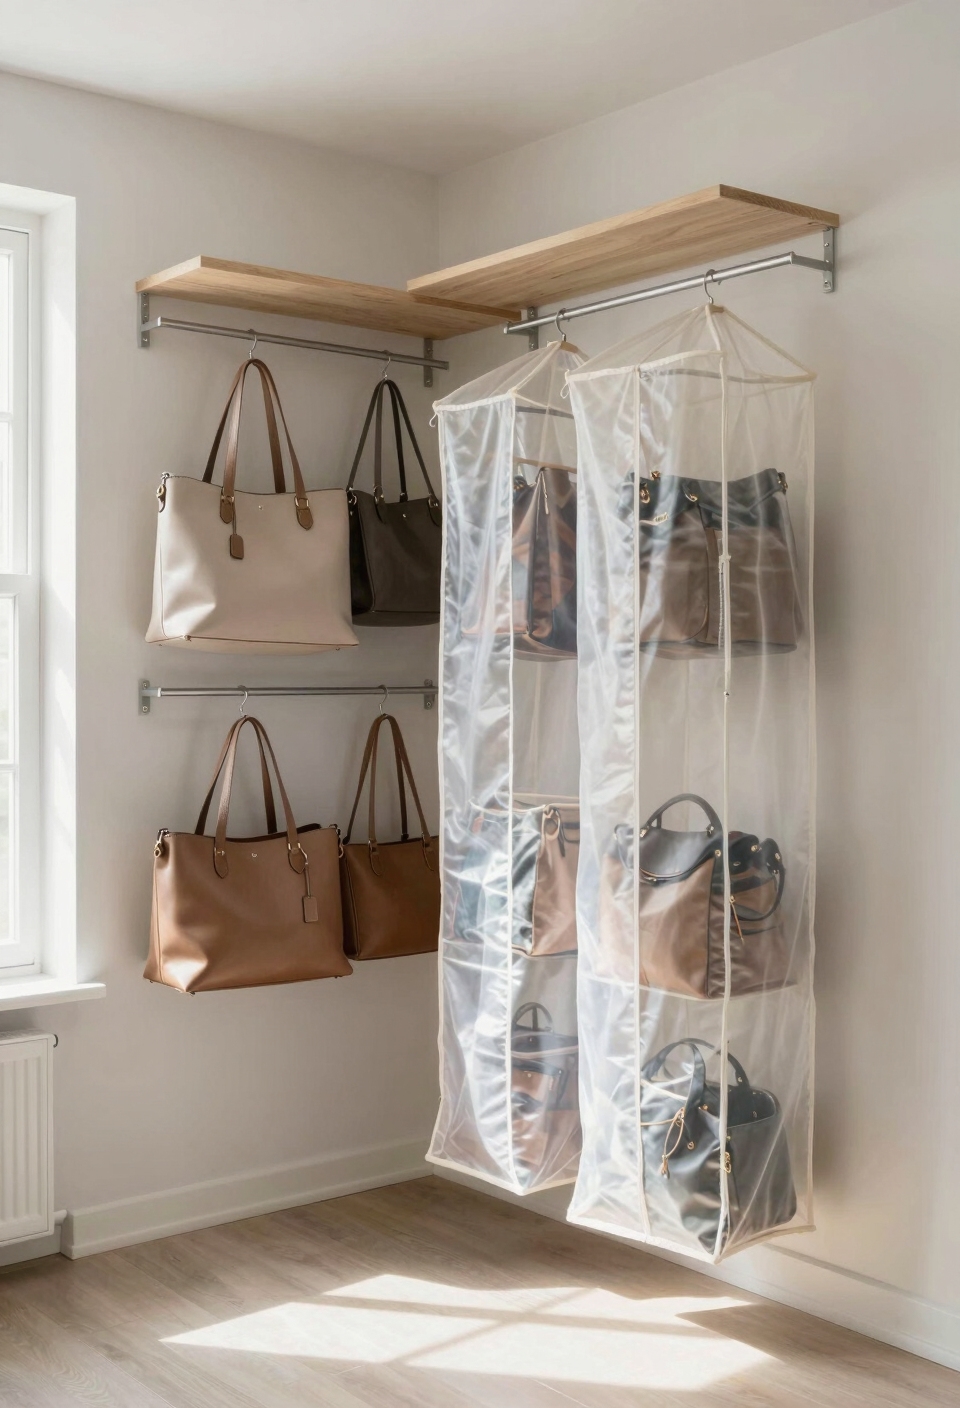
While drawer dividers work great for smaller bags, your larger totes need a completely different approach. Hanging garment bags or sturdy hooks become your best friends for tote organization. You can hang multiple totes on a single rod using clip hangers, which saves precious floor space and keeps everything visible. Clear garment bags protect your bags from dust while letting you see what’s inside instantly. Install hooks on closet doors, walls, or the back of your bedroom door. This method works wonderfully because it keeps your large bags accessible without consuming valuable shelf or drawer real estate. Your totes stay organized, protected, and ready to grab whenever you need them.
Door-Back Shoe Racks for Extra Capacity
Since your closet’s back wall is probably just sitting there unused, an over-the-door shoe rack offers serious storage potential for bags you don’t reach for daily. You can hang smaller crossbodies, clutches, or weekend totes right on those pockets without taking up floor space.
Door back organization works because it uses vertical real estate you’ve already got. Standard racks fit most interior doors and hold surprisingly much weight when installed properly.
This shoe storage hack costs around fifteen to thirty dollars, making it economical. You’ll appreciate having your everyday bags visible while keeping seasonal ones tucked away neatly and accessible whenever you need them.
Shelf Risers to Stack Bags Vertically
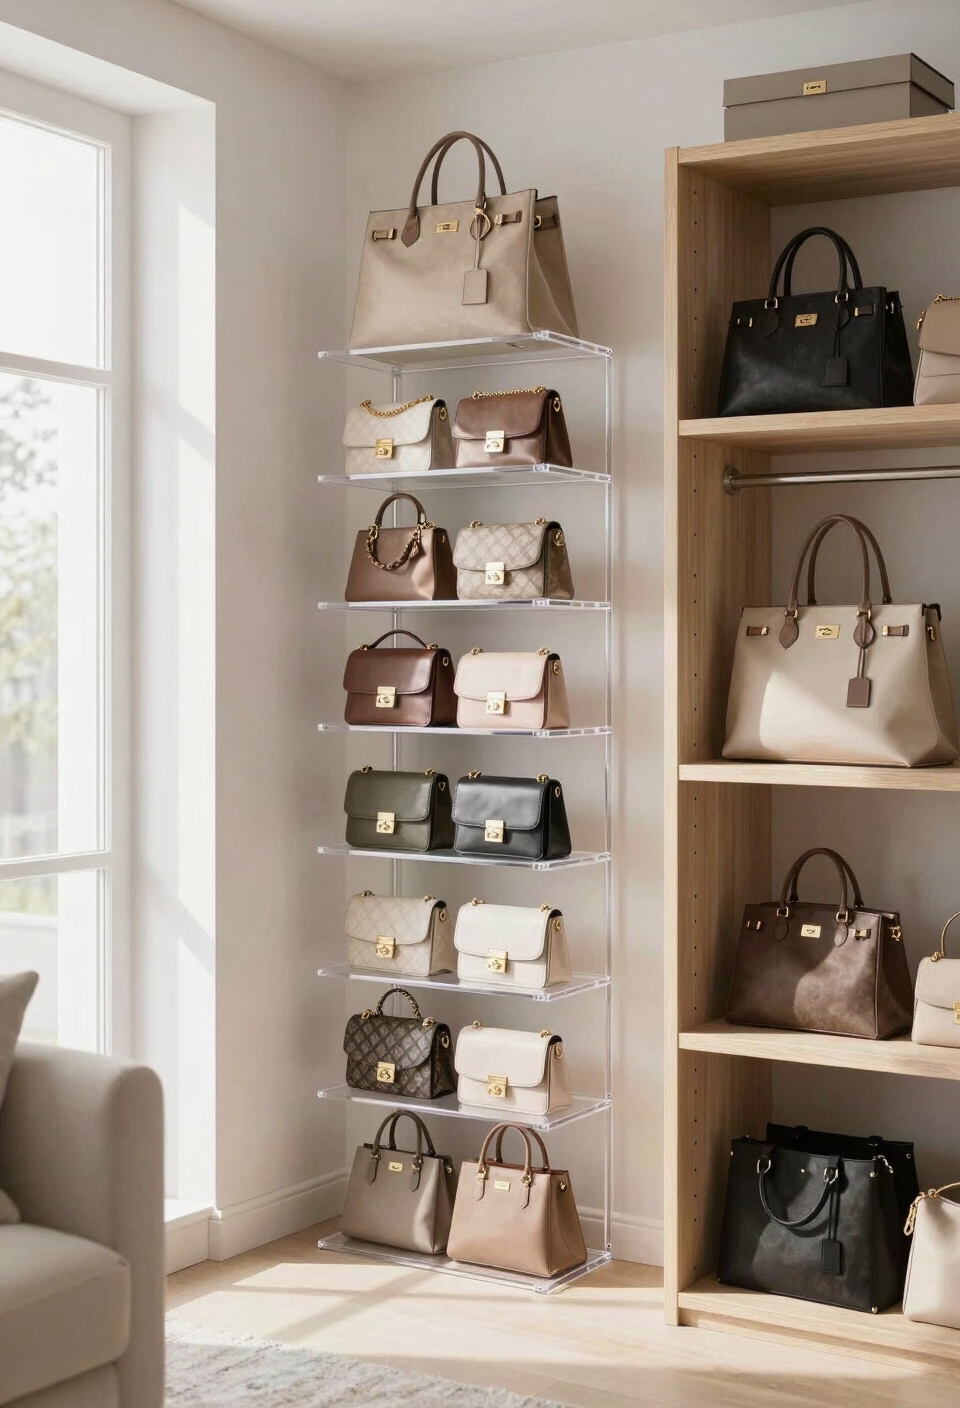
Shelf risers, those adjustable metal or plastic stands, can transform your closet shelves into a multi-level bag organization system. You’ll double your storage capacity without expanding your closet footprint, which is the whole point, right?
These risers, typically ranging from 4 to 12 inches tall, create vertical stacking opportunities for your bags. Simply place a riser on your shelf, then stack smaller bags underneath and larger ones on top. This approach keeps everything visible and accessible.
You can mix and match riser heights to accommodate different bag sizes. The result? Better bag organization that actually fits your space constraints.
Ceiling-Mounted Pulleys to Hoist Seasonal Bags
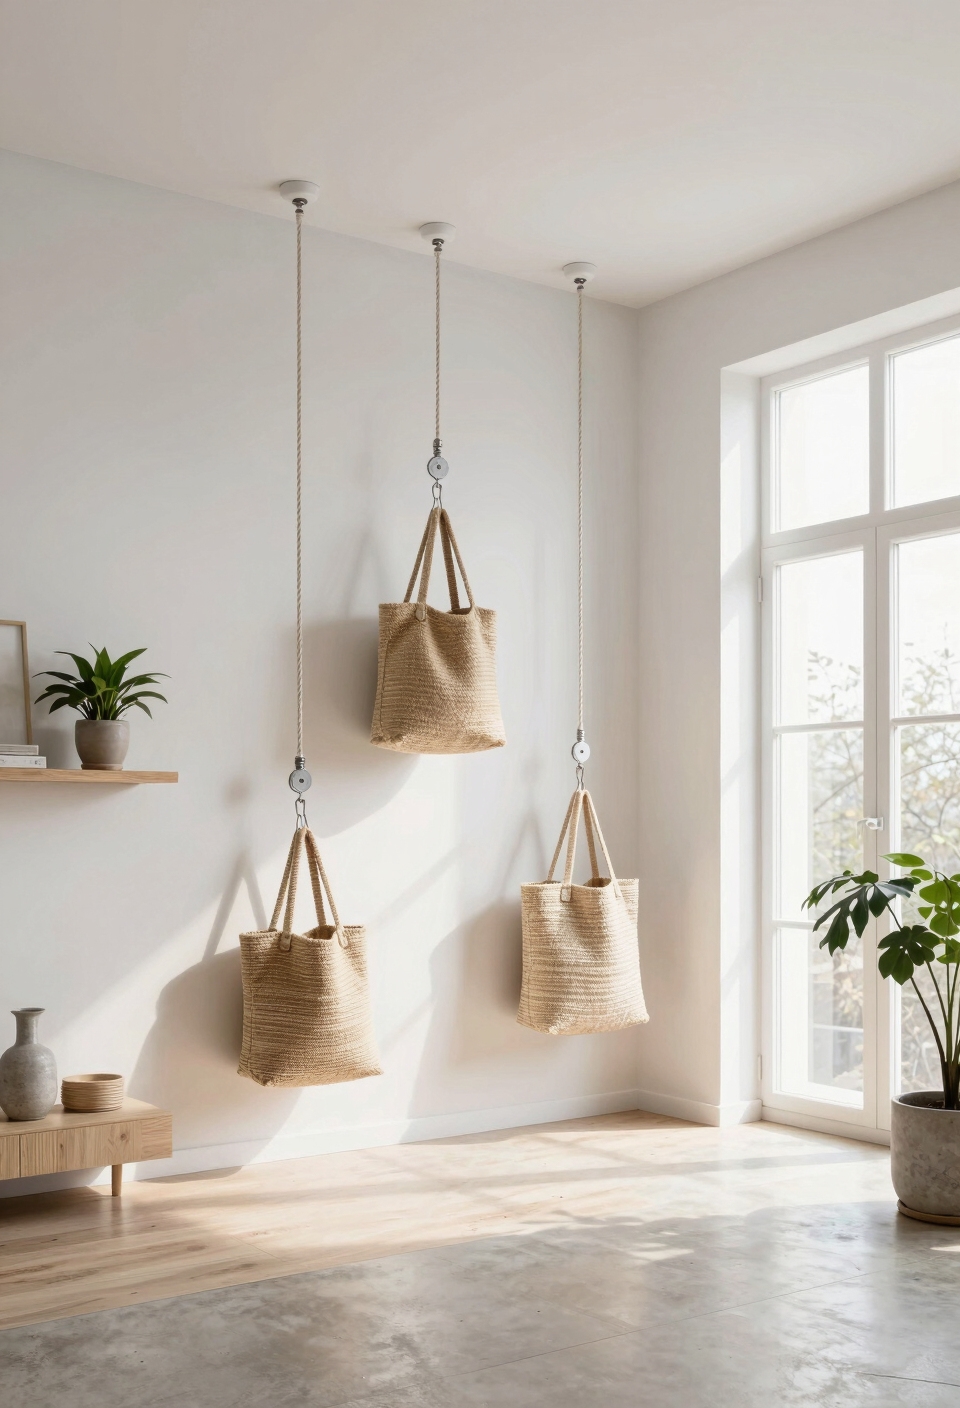
If you’ve got seasonal bags that only see the light of day a few times a year, ceiling-mounted pulleys might be your secret weapon for reclaiming valuable closet and floor space. These pulley systems let you hoist bulky luggage, holiday decorations, or winter gear straight up to your ceiling, keeping them completely out of the way. You’ll need basic hardware, pulleys, rope, and secure ceiling anchors, which most hardware stores stock. For seasonal organization, this approach works especially well in bedrooms or closets where vertical space goes unused. Just remember to label everything clearly so you’re not hunting around wondering what’s stored up there.
Label Everything for Easy Access
Once you’ve got your bags tucked safely overhead, the real breakthrough is making sure you can actually find them again. Without a system, you’ll waste precious time searching through unlabeled containers.
Create labels using a label maker or permanent marker on masking tape. Identify each bag’s contents, ”winter coats,” “beach gear,” “holiday decorations”, so you know exactly what’s stored where. Label categories clearly with the season or occasion, making retrieval straightforward.
Consider adding dates to labels, especially for seasonal items. You’ll appreciate knowing when you last used something. This simple step transforms your storage system from frustrating to functional, saving you real time when you need those bags.
Frequently Asked Questions
How Do I Decide Which Bags to Keep Versus Donate or Sell?
Most people own 15+ bags they’ll never use. You should keep versatile bag types you’ve worn in the past year, then donate duplicates. Implement smart storage techniques to maximize your small space efficiently.
What’s the Best Way to Clean and Maintain Bags Before Storing Them?
You’ll want to empty pockets thoroughly, then use soft brushes for cleaning techniques suited to your bag’s material. Apply appropriate conditioners for bag maintenance, let them dry completely, and store them in dust bags to prevent damage.
How Can I Protect Expensive Designer Bags From Damage During Storage?
You’ll absolutely transform your designer bags into museum-quality treasures by wrapping them in luxurious bag padding and storing them in protective storage containers that shield against dust, moisture, and light damage completely.
Should I Store Bags With or Without Their Original Dust Bags?
You should store bags with their original dust bags. They’ll protect your designer pieces from dust and scratches. Use proper stacking techniques, place heavier bags on bottom, to maximize space while maintaining dust bag benefits.
What’s the Ideal Temperature and Humidity Level for Long-Term Bag Storage?
You’d maintain 60-70°F with 30-50% humidity, like a climate-controlled museum preserves artifacts. Your bags need stable temperature control and consistent humidity levels to prevent material degradation, mold growth, and structural damage over time.
Final Takeaways
You’ve got this. With these storage solutions, you’re not just organizing bags, you’re reclaiming your space and your peace of mind. You’ll actually find what you’re looking for instead of digging through piles. Start small, try one method, then build from there. Your future self, standing in an organized closet without clutter chaos, will thank you.

- 22 Small Space Vanity Ideas Bedroom Setup Hacks - March 10, 2026
- 23 Small Space Coffee Table Ideas With Soft Curves - March 9, 2026
- 21 Small Space Fireplace Ideas in Tactile Stone - March 8, 2026